How to lay artificial grass: An expert’s guide
We previously touched upon the install of artificial grass, highlighting how the success of a finished artificial lawn is reliant on laying the correct type of sub-base layer. Here, we explore the entire process of laying artificial turf and how to achieve the best possible results that will last the test of time.
Below are our 6 recommended steps to laying artificial grass on soil using our Drainbase tile system, available from ECCO Products, to achieve the very best finish.
Don’t have time to read the full detail? Check out our YouTube installation video!
Step 1 – Prepare the ground
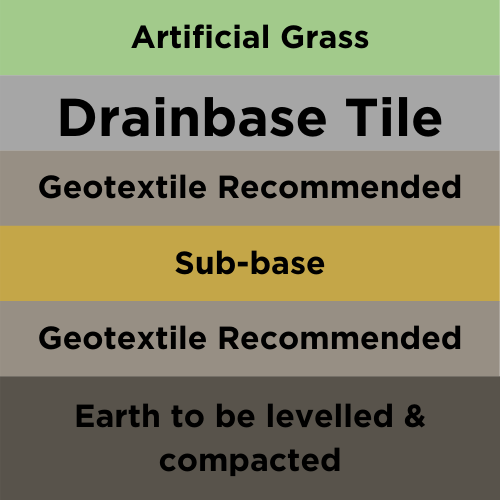
Review the area that you will be laying your artificial turf in, make sure that it is clear and ready to start preparing. For example, ensure that any cables or pipes are below the depth you will be digging. Next, remove the existing turf and its topsoil – we recommend removing a depth of between 10 and 25cm. Wet and compact the remaining ground before laying a geotextile to keep weeds and regrowth at bay.

Step 2 – Create an edge
Laying an edge to your lawn area will not only provide definition and a smart finish but will help to increase the lifespan of your lawn. Drainbase has bespoke borders that prevent the turf from curling and avoids pests accessing the base of the tiles. L shaped borders are also available to prevent side soil from being washed away. Whatever edging technique you use, ensure the edging is not laid higher than the final grass line to allow water runoff from the turf.
Step 3 – Lay your sub-base
Check out our previous blog to help you choose the most appropriate sub-base for your project. We recommend laying your sub-base at a minimum depth of 50mm or 75mm for areas that will experience heavier use. Once you have laid your sub-base, make sure to compact the area again and lay your second geotextile on top.
Step 4 – Lay your laying course – or better still Drainbase tiles.
The laying course is the material that your artificial grass will be laid directly on top of. It is important to ensure this course is level and even to allow the perfect finish to your lawn. Drainbase Tiles achieve this effortlessly thanks to the nine flexible zones on each tile that allows it to maintain contact with the sub-base.
When laying Drainbase tiles we recommend starting against the border and working row by row, cutting any tiles to size where necessary which can be easily achieved with a saw or disc cutter. The tiles are comprised of recycled HDPE and click together easily when light pressure is applied. Ensure that you click the tiles together correctly as the design allows for them to shrink and expand within different temperatures throughout the year.
Step 5 – Roll out your turf
Lay out your turf, keeping in mind the viewing direction of the pile and having the pile direction running toward the property for the best outlook. We recommend brushing the turf against the pile direction and letting it settle for a few hours, or ideally overnight, to let any wrinkles drop out. You can then brush through the turf again and trim to size. When trimming, ensure your blade stays sharp by changing it regularly to achieve the best cut. In larger areas you may need to join pieces of turf together, when you have done so apply some weight to the joins such as with heavy stones of plant pots until the adhesive has dried.
Step 6 – Fix and finish
Once your turf has been cut to size and any joins dried, place the Drainbase fixing caps throughout the turf, avoiding the outermost row of tiles. Then screw the artificial grass on to the fixing caps with the screws provided. Finally, brush through against the pile once again to bring the grass fibres upright.
Sit back and enjoy the efforts of your labour, safe in the knowledge that Drainbase will ensure the longevity of your lawn.


